This post introduces some considerations and techniques for handling images within WordPress. This is particularly useful if you are building a website that will be handed over to a client who will then maintain the content with no further involvement from you, the developer.
A Poor User Experience
Ever gone to check in on your latest signed-off web project only to discover something is not quite right? The client has uploaded their own images and they are not only cropped incorrectly but the images are distorted in an attempt to ‘make then fit’. Or, perhaps the image appears visually OK, but the file is outrageously over-sized resulting in minutes of waiting for the page to finish loading. This is clearly not a good state of affairs for the end-user’s experience.
The issue is really at the developer’s end. A lot of clients will not be aware of the ins and outs of image compression. Even if they are somewhat aware, they might not have a convenient method to compress the images they want to upload. Even a small barrier will stop a busy user from completing a task they don’t fully understand and regard as necessary.
This post sets out the solutions I often use to tackle such image challenges for new WordPress website builds.
WordPress Image Sizes
WordPress lets you define your own image sizes. Newly uploaded images are then cropped to this size (plus some other default sizes) before being added to the media library. There is no limit to the number of image sizes you can define, so define all that you need. The original image size will also remain available.
The documentation for add_image_size is worth a read, particularly the last argument regarding how to crop and scale images. You can use wp_get_attachment_image to retrieve the image URL for a respective size later on.
If your theme makes use of featured images then you will want to use set_post_thumbnail_size to configure the appropriate image size and cropping attributes. Note, the image size and cropping attribute arguments match those for add_image_size.
Compressing Images
There are lots of plugins out there to automatically compress the images in your media library. My favourite is Compress JPEG & PNG images by TinyPNG. You’ll need to register for an API key, but the first 500 compressions each month are free. Unless the site you are working on has a lot of regular image uploads this is very likely fine. Note that a compression is not per unique image, but per unique ‘image and size’ combination. I have only had a single case in the last year where this API limit has been a problem.
Once installed, all newly uploaded images will be automatically compressed. The plugin does provide a ‘Bulk Optimisation’ tool, available from the media menu within the WordPress dashboard, but don’t click it just yet! If you want to make an additional image size available for every upload we can be more efficient with our time.
Retrospectively Cropping and Compressing Images
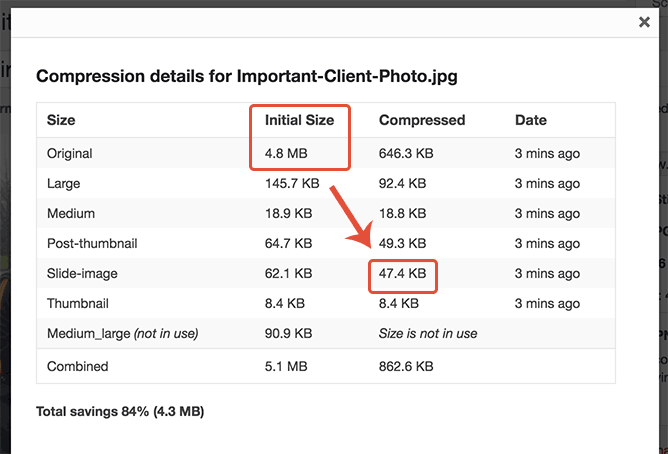
We now have a WordPress theme aware of the image sizes we want to use and a compression plugin installed. All good stuff, but so far it hasn’t done anything for the images already in the media library. Time to install another plugin: Regenerate Thumbails, which will regenerate all image sizes for you (not just the thumbnail size). If you’ve installed the TinyPNG plugin then this will also compress the images after they’ve been resized.
If your image files are many and large this will take a fair while, so best start it running before you make your next tea/coffee.

Our large file upload is now a reasonable file size and available in sensible dimensions for our home page slider.
User Education
My final suggestion is to educate your client and not leave them in the dark regarding these techniques. Sure, they may never have to worry about image compression or cropping, but an educated user is more likely to spot problems in this area. This in turn helps them to keep an eye on their own website and ensure there are no easy-to-fix image errors spoiling the user experience.