Proxy auto-config files, or PAC files, are a neat way to programmatically decide whether to send requests for a website via a proxy or direct. This post is a brief introduction on how to write and install such a file.
The Background
A couple of months ago I needed to access a web service running on a VPS that, due to historical reasons, has a whitelist of trusted IP addresses. I work from my home office just over half the week. This has an internet connection that provides a dynamic IP address to the outside world. It’s impractical to regularly modify the whitelist entry every time my ISP decides to issue me a new address.
An initial attempt to work around this was to proxy all my traffic through another VPS which had a static IP. This worked as a temporary solution but was causing some additional headaches with a couple of VPNs. I needed a more sophisticated answer.
Enter PAC Files
PAC files are used by browsers to know whether to send requests directly to the source or to a proxy server. Although not particularly well known, they’re super useful for fine grain control to decide which requests should be sent where. For example, if your IP restricted service is running at api.foobar.com, we can configure our file to send all requests for api.foobar.com out over a certain SOCKS proxy. For everything else, we can send the traffic out directly.
File Format
The file itself is JavaScript that needs to provide one function: FindProxyForURL(url, host). This function must return a string telling the browser what to do. The returned string should default to DIRECT, for business as usual traffic, or PROXY my-proxy.com:12345 as required.
There is no preconfigured location for the file. The file itself doesn’t even have to be stored locally, although it probably makes sense to have it stored on your machine if it fits your configuration, as the file is regularly requested.
An example file might look like this:
function FindProxyForURL( url, host ) {
    // Default to using no proxy.
    var ProxyConfig = "DIRECT";

    if( dnsDomainIs( host, "api.foobar.com" ) ) {
        // Requested domain matches, let's use the proxy.
        ProxyConfig = "SOCKS5 127.0.0.1:12345";
    }

    return ProxyConfig;
}
Configuring on macOS
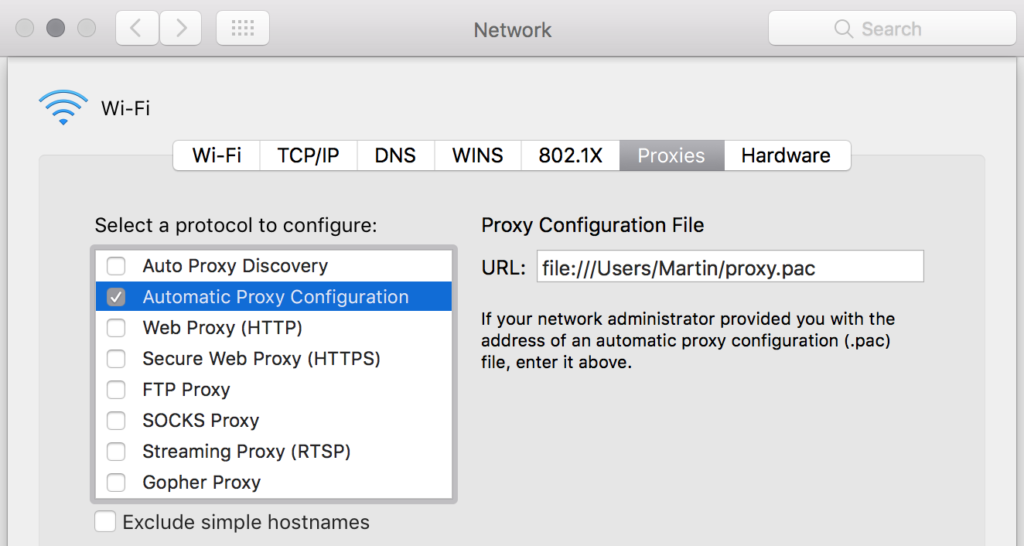
In Chrome on macOS, navigating to Settings > Advanced > System > Proxy Settings drops you into a system level dialog for network proxy settings. You can configure the path to your PAC file here, as shown:

SOCKS and Other Proxies
The wiki page for PAC files does a fair job with the overall purpose but misses out some of the additional configuration options available. For a more substantial run down of the options check out the MDN Proxy Auto-Configuration File page.
My particular setup involves running ssh to act as a SOCKS server, e.g. ssh -D 123456. I can then use a string result from FindProxyForURL in the format of SOCKS5 x.x.x.x:n to send data out out to this proxy.
Finding Out More
The MDN Proxy Auto-Configuration File page is well put together and worth a read. Otherwise I suggest having a go creating a PAC file. Read up on the predefined functions that are available to use in the file and do some experimenting. You could always create a PAC file, enable it and leave the function as returning ‘DIRECT’. That way you’ll have the file and configuration ready to go should you need to create a future proxy rule for certain websites.